My ebooks The Passion Killers, A Dark Wind of Vengeance, Blood Beyond the Abyss and The Second Layer of Hell (apocalyptic fiction) are now available for download. They are the first four installments in the Path of Survival series. To see additional information, click here .

Instructions For One Ounce Camp Sandals
And Modified Socks
The Sandals:
These ultralight camp sandals are made from shoe / boot inserts and nylon cord. They take only a few minutes to construct and no special tools or skills are needed. Brawny's pair in women's size 7 - 8 weigh about an ounce. My pair in men's size 12 weigh about 1 1/2 ounces. This represents a weight savings of 2 - 3 ounces over a pair of flip-flops, and about 8 ounces (a half pound!) over "lightweight" Wal-Mart or K-Mart sandals.
In our opinion, these sandals are definitely not sturdy enough to be used for hiking or water crossings. However, they seem durable enough to wear around camp and perhaps even in town.
Brawny used a pair from Fontana Dam, NC to Mt. Katahdin, ME (about 4 months) for camp and town use on her 2002 AT thru-hike. She had to re-tie them once. However, when she finished her hike, they were in usable condition.
If you want a thicker sandal that provides more protection from rocks, roots and wet ground, use your shoe / boot insert as a pattern and cut the material from a closed cell sleeping pad. Most Wal-Mart stores have these sleeping pads in the sporting goods department for $5 - $6.
The following items are needed to make the sandals:
One pair of shoe or boot inserts (new or used)
About 2 feet of nylon cord.
Knife or scissors for cutting cord.
Matches or lighter for sealing cord ends.
Sharp pointed object to force cord through insert holes (knife or scissors tip works; knitting needle might do nicely).
Marking pen (optional).
Pair of sandals to use as a guide (optional).
It helps if the shoe / boot inserts to be used already have perforations in the sole. These holes can be used for attaching the nylon. However, if your inserts have no holes, you can make them where you want them with the knife or scissors tip or other sharp, pointed tool. Be careful though, I wounded my index finger with a metal toothpick when the toothpick suddenly came through the insert after I'd put a lot of pressure on it.
To begin, cut 2 pieces of nylon cord, each one about 12 inches long. Heat seal the ends with the lighter. Select either a left or right boot / shoe insert and decide where you want the strap installed that will fit between your big toe and your second toe. Mark the spot with a marking pen if you want.
Make a hole in the insert (if needed), or use a perforation that's already there. Then force the nylon cord through the hole from the bottom of the insert. When it is through, tie a knot in the other end of the cord and pull it until the knot is flush against the bottom of the insert.
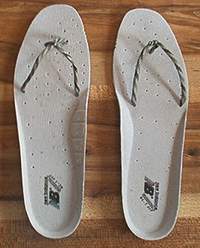
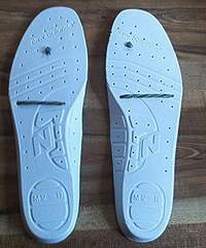
Next, decide where the nylon cord will go back through the insert on one side (it may help to look at the photo on the left). Force the nylon cord through the insert. Bring the cord across the bottom of the insert and decide where it will go back to the other side (it may help to look at the middle photo). Force the cord back through to the top of the insert, and tie it to the cord that was threaded through previously. (It's not as difficult as it sounds.)
At this point, you can adjust the height of the strap by how far down the end of the nylon cord you place the knot. When you have decided how much of the end of the cord needs to be removed, cut it with the scissors and heat seal the end.
Repeat this procedure for the other boot / shoe insert.
The Socks:
We have modified some socks to wear with our ultralight sandals. These socks are the ones we normally sleep in, and they are not used for hiking. The way the straps on the sandals fit between the toes creates difficulties when regular socks are used. To remedy this, Brawny makes a straight mark (with a felt tip pen or marker) on the socks between the big toe and second toe. She then sews a "V" shaped seam on either side of the pen mark, and then makes a cut on the straight pen mark. See photo below:
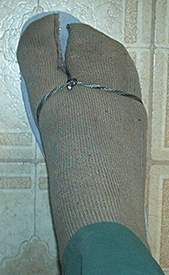
This works well, and allows us to comfortably wear our ultralight sandals in camp and put them on again with no hassles during the night, if necessary.
"Rainmaker"
David Mauldin