My ebooks The Passion Killers, A Dark Wind of Vengeance, Blood Beyond the Abyss and The Second Layer of Hell (apocalyptic fiction) are now available for download. They are the first four installments in the Path of Survival series. To see additional information, click here .

Instructions For One Ounce Pot Support
For Soda Can Stove
I designed this item because of difficulties I've encountered using metal stakes as a cooking pot support. It also gives me the option of using my soda can stove inside during power failures and to test backpacking recipes in my kitchen. Using metal stakes works well enough on backpacking trips, but when the ground is rocky and conditions are bad (rain, bugs, extreme fatigue, etc.), having a stable cooking pot support to plunk down on the ground is very appealing to me. Also, if the stakes are used for your tent or tarp, you'll need to remove the stakes in the evening, and set them up again for cooking the next morning. Although not designed as a wind screen, the pot support will provide some wind protection for the soda can stove.
If you don't have experience working with power tools, tin snips and sharp metal surfaces, this probably is not a good first project. Please read the instructions carefully before you begin. It is not unusual to get a small cut when I make one of these, and I've had a flying metal chard bounce off the lens of my safety glasses.
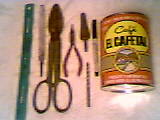
To make the One Ounce Pot Support for the Soda Can Stove, you'll need the following items. All these items are pictured above (left photo) except the power drill, safety glasses, work gloves and can opener:
1 - Ruler or tape measure
2 - Flat file
3 - Heavy duty tin snips
4 - Needle nose pliers
5 - Grinding attachment for drill
6 - 1/4" drill bit
7 - Marking pen
8 - Metal can at least 4" in diameter (but smaller diameter than your cooking pot) and 2 1/2" tall or taller.
9 - Safety glasses
10 - Variable speed power drill
11 - Can opener
12 - Heavy work gloves
Assuming the metal can is empty, the top will already have been removed. Use the can opener to remove the bottom. (Some folks have suggested leaving the bottom of the can intact so that the pot support can be used as a "twig burner". It may be a good idea, however, I haven't tested it and I'm not sure that the thin metal will stand up to having a wood fire built directly on top of it. Also, if the heat warps the bottom, the entire pot support will probably get warped, too. Leaving the bottom intact will add about a half ounce of weight.)
Remove the label from the empty can; it may look like its painted on, but most likely it is a paper label and will peel off with a little effort.
Decide on the height of the support. I make mine 2 1/2" high; I wouldn't recommend making it any shorter. After you have decided how tall it will be, use the ruler and marking pen and make several marks around the can at the proper height. Use a flexible straight edge (such as a piece of cardboard or paper) and the marking pen to connect the marks and make a guide "ring" on the can. When this is done, you will have a guide to use for cutting out the pot support with the tin snips.
At this point, put on the heavy work gloves. Make a vertical cut with the tin snips down the side of the can to a point about a half inch above the guide ring you made with the marking pen. Go very slowly and carefully and don't get in a hurry. Be careful to keep the sharp edges away from your hands at all times. After the cut is made, turn the tin snips and cut parallel to the guide ring (and 1/2 " above it) until the top of the can is cut completely off. When the can has been cut in two, make another cut with the tin snips on the guide ring all the way around the can.
Put on the safety glasses, and still wearing the gloves, file down the sharp edge with the flat file. When the edge has been partially dulled, I usually finish dulling it with the power drill and grinding attachment. Holding the can securely, hold the drill at a 90 degree angle to the sharp edge and use the grinder to finish dulling the edge.
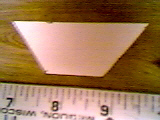
I use the cut edge as the bottom of the pot support, and the factory finished edge as the top, however, you can configure it either way. After you decide which is the top and which is the bottom, you'll need to make the sidewall cut outs. For this, I use a guide / pattern made of light cardboard. The pattern is 1 1/8" in height. It is 3" in length at the top and 1 1/4" in length at the bottom (see middle photo above).
After the pattern is made, locate the seam of the can. Make one pen mark 1 1/2" to the left of the seam at the top of the pot support. Make another pen mark 1 1/2" to the right of the seam. Then, take the cardboard pattern (with 3" side up) and trace two outlines on the pot support. Both outlines should begin at the pen marks that are 1 1/2" on either side of the seam. If this is not clear, stop, go back and read it again. It may also help to look at the photos above (photo on right). When the sidewall cut out guides have been traced onto the pot support, use the tin snips to make the sidewall cuts. Take your time and be careful.
After the sidewall cut outs are finished, use the flat file and grinding attachment to grind down the sharp edges. Next, use the drill bit to make the breather holes. If you want the breather holes to look neat and be in a straight line, make another guide ring around the pot support about 10/16" from the bottom. When you drill the breather holes, try to keep the drill bit on the guide line. If you don't use a guideline, just drill the holes so that the center of the holes are approximately 3/4" from the bottom of the pot support. I suggest placing your non-drilling hand firmly on top of the pot support to hold it down while you are drilling. Otherwise, the pot support may spin with the drill bit once the hole is made. This can result in a nasty cut, gloves or no gloves. This has happened to me twice; the first time I received a small cut, the second time the glove protected me.
Locate the seam of the can and drill the first hole about 1/4" to the left of it. Drill two additional breather holes to the left of the seam, about 1/2" apart. Drill three additional holes in similar fashion to the right of the seam. Drilling into the seam itself may weaken the pot support. The breather holes should not extend to a point where they are under the sidewall cut outs. Rotate the pot support and make a pen mark at a point 180 degrees from the seam. Drill three more holes to the left of this mark and three more to the right of it, in the same manner that the holes were drilled on opposite sides of the seam.
When you are done, use the flat file, drill and grinding attachment to file down all sharp edges. Double check and make sure ALL edges (including those around the breather holes) have been ground down and are no longer sharp. A cut hand while in the back country miles away from the nearest road can be a very serious matter. Use the needle nose pliers to straighten any edges that may have been bent while constructing the pot support.
"Rainmaker"
David Mauldin
rainmaker@trailquest.net