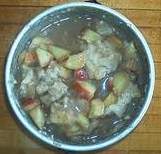
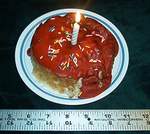
Apple / Fruit Cobbler
The photo shows an apple cobbler, but any fruit may be used for this trail dessert.
One medium apple, washed
3/4 - cup water
1/3 - cup brown or white sugar
1/4 - teaspoon cinnamon
Dash of salt
Biscuit Topping:
2/3 cup biscuit mix
1/4 scant cup water
1 - tablespoon sugar
Mix the powdered mix with the water. It should make stiff dough. Set aside.
Thinly slice apple into your pot. Add the water, sugar, spice and salt. Other spices, which taste good with trail fruits, are nutmeg, cloves or ginger. Cover pot and prepare stove.
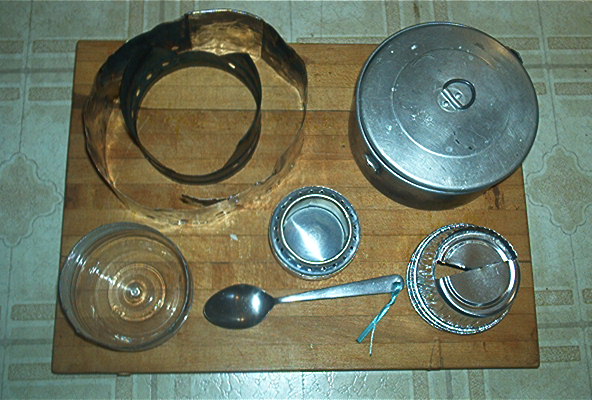
Place one ounce of fuel into your stove, with pot support, and windscreen surrounding it. Have simmer attachment ready. Light the stove and set the covered pot on it.
Allow the fruit mixture to come to a boil. Remove pot and place simmer attachment over stove, being sure not to put out the flame. Pour prepared biscuit mixture over hot fruit mixture and cover with lid. Place pot back on heat and allow to cook for 10 more minutes. Lift the lid using potholder or other utensil, and check the progress of your cobbler. It is ready if the dough is firm but moist. If it is still sticky, replace lid and allow to cook a while longer.
When your cobbler is finished, remove from heat, uncover, and extinguish the stove using the flame snuffer.

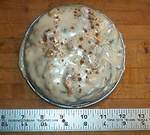
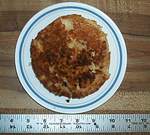
Pizza
This pizza is a vegetarian supreme. It was made in a 2 pint pot, but can be expanded to fill a larger one. Toppings are limited only by your imagination .
Toppings For Pizza In Photo:
chopped onions
sliced olives
3/4 - cup diced tomatoes
1/3 - cup mozzarella cheese, grated, or broken into small bits
1 tablespoon Parmesan cheese
Dash of salt, pepper, basil
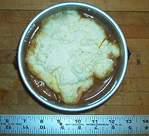
Pizza Dough:
1/2 cup biscuit mix
3 tablespoons water
1/4 teaspoons garlic and oregano
1 tablespoon oil
Mix the powdered mix with the water. It should make stiff dough. Set aside.
Pour one tablespoon of oil into your pot. Prepare stove.
Place one ounce of fuel into your stove, with pot support, and windscreen surrounding it. Light the stove and install the simmer attachment, with one small triangle open, allowing for just a very small flame.
Pour prepared biscuit mixture into the pot, spreading it to cover the entire bottom. Set the pot on pot support.
Cover with lid. Place pot back on heat and allow to cook for 7 more minutes. Lift the lid using potholder or other utensil, and check the progress of the pizza crust. It is ready if the dough is firm but moist. If it is still sticky, replace lid and allow to cook a while longer.
When the crust is firm, spoon the tomatoes, vegetables, and cheeses over it. Replace the, and allow to cook until the cheese is melted. Sprinkle salt, pepper and basil over entire pizza.
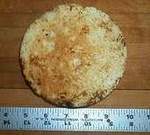
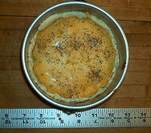
Raisin Cinnamon Coffee Cake
Place one ounce of fuel into your soda can stove. Set pot support and windscreen around it. Have simmer attachment ready.
Prepare the coffee cake mix by stirring together:
3/4 cup biscuit mix
3 tablespoons sugar
1/4 - cup water
1/4 - cup raisins
1/2 - teaspoon cinnamon
This should make stiff dough.
Light stove. Place simmer attachment over stove once the flame is going, closing it down until just a small flame remains. Put one-tablespoon oil into pot. Set pot on pot support and spoon mixture into it.
Cook for 10 - 12 minutes covered. Top of lid should become hot too touch.
Remove lid with gloves and if the cake is firm but moist it is done. If not, cover and allow to cook a while longer.
When cake is done, remove pot from heat. Using the snuffer, put out the stove.
Allow to cool before removing from pan. Prepare frosting from:
1/2 cup powdered sugar
1 - teaspoon vanilla, or milk, or water.
Spread frosting over cake.
This is a very tasty treat.
- - Rainmaker & Brawny
For a totally new look at a do it yourself stove, check out the Backpacker's Hobo Stove I built on My Brawny Youtube Channel. Its my most popular video so far. The stove weighs just 3.5 ounces, uses twigs and pinecones for fuel, and replaces the pot support and windscreen as well as the stove. Field tested on the Foothills trail.
Bon Apetite!