BrawnyView Blog/ My Journey to Freedom and Ultralight Backpacking
Everything Except Corn Pasta
Just Released!
An Ultralighter's True Trail Stories-Beyond the Journey
This book has not been printed in hard copy. It sells as a Kindle or Nook download for $7.99
End of Days Series.
Books by Carol Wellman at Barnes and Noble
Book Reviews and behind the scenes details.
The Packless System
---an ultralight backpacking system for external frame backpacks
I saw one fellow hike past us the summer of 2000 with a conglamoration of gear strapped to his pack.
Rainmaker heard of the idea on his 1999 hike on the PCT.
It made so much sense to me, when Rain first relayed it,
that I have adopted it.
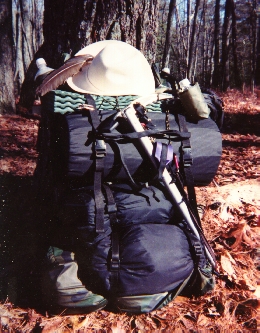
I took the pack off my external frame(saving 14 ounces)
The stuff sacks I was using anyways, one for food, one for clothes, one for sleeping bag( and now also my closed cell pad)
and one for the tent, are now cinched directly to the frame.
This shows my gear off of my frame, and laying near its appropriate stuff sack. Everything is removable from the frame.
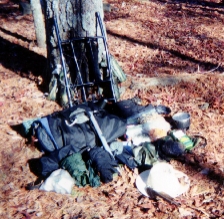
A silnylon pack cover
weighing 1.5 ounces, offering protection from rain
may be placed over all for additional security.
Some advantages to this system are that the stuff bags may all be removed from the frame, leaving no pack behind for some critter to knaw on. Each stuff bag may be utilized in the evening for hanging food bags, and a pillow case. The largest one may provide additional warmth for the feet inside the sleeping bag.
Each stuff sack has room enough for an additional ditty bag. When resuppling for week long sections, the food may also be distributed among the sacks, and carried on top in a plastic bag.
Arrangement of gear:
Top sack has closed cell pad, sleeping bag, and the personal hygiene ditty bag.
Second sack has clothes, raingear and first aid ditty bag.
Third sack has food, stove and fuel tabs.
Fourth sack has tent, stakes, parcord, murphy kit, and journal.
The hip padding consists of my camp towel, and silnylon pack cover.
Also, I have a small fannypack to put camera, bug repellant, lip balm, etc, in. A compass will be in its own special pouch, easily accessible on a sholderstrap.
This system was tested before I left for the Pacific Crest Trail. My Journey To Freedom and Ultralight Backpacking was written and published in March 2003 describing this and other ultralight adventures.
Test Results
It was stable, and versatile, and drew a lot of attention from hikers and townsfolk as well.
However, a few problems were noted. At first, the organization was difficult, and what evolved was the following loading system:
The middle bag was looped on first over the frame. It contained a rolled up closed cell pad. Into that cylinder shape a black plastic bag was placed, and my sleeping bag stuffed into that. In the mouth then was placed my ditty bag with hygiene and Murphy kit things. That was easy to get to in times of repair.
A smaller silnylon bag was next put on the frame, via loops sewn into the seams. It held all my food, and was quite heavy at times, with enough for 9-10 days, 190 miles. The middle bag was shaped with the closed cell pad, and could support this weight nicely.
I swapped out for a larger silnylon bag for the bottom bag, replacing the two bottom bags. It was easier to pack and cinch three bags instead of four. All of these bags have loops in the side, or with this system, horizontal seam, so the two cinch straps passed through these loops.
This last bag held my tent, rolled up in its plastic ground cloth (no stuff sack of its own) and my clothes, carried in a black plastic bag, inside the stuff sack. When my food bag was full, the cook system was placed in the mouth of this bag, for easy access when I would cook supper at streams before hiking on further that evening. Many evenings in the desert we did not camp by water.
I ended up ditching the fanny pack because all my maps, wallet and other vitals were carried in a pocket sewn to my shorts, and two side pockets.
My ice ax was strapped to the bags, and all drawcords brought together and clipped, to prevent one being lost. All the loops held up for the duration of the journey. A photo of me on the trail, and my system may be seen on my journal 2001 page.
The reasons I elected to try a Nike day pack from Bend, Oregon, and onward are the following:
1. My frame was actually too long for me, causing the bottom bar to hit my back uncomfortably. A Z-rest had been used for padding, in place of a back hip belt, but to lighten up near Sonora Pass, I ditched it and finally opted to try a new system.
2. Using this day pack allowed me a 21 ounce pack instead of the 28 ounces of the packless system.
3. This Nike pack was only $25 and had 4 pockets, a great find.
4. Having checked out the packless system, was ready for a new gear test.
Conclusions
However, it takes some getting used to, and one must be prepared to answer questions from amazed hikers and townsfolk. There may be some derision to the novelty of the system. Also some admiration.
This system can be modified, enlarged, minimalized and repaired for little money. It can be stripped down for day hikes. I think it has alot of potential in the hiking community.
In summary, a good frame is the beginning of a workable, inexpensive, custom pack. The silnylon bags are next, 3 recommended, double stitched, with loops in the side and bottom seams. Then, a few 7 foot cinchstraps, with clip closures, instead of the kind that must be threaded through.
Post Script 2008
I bought another (never used) external frame backpack at a thrift store that fit me very well in 2004. I kept the original hip belt and used the heavy packcloth pack as a pattern for a silnylon pack which could be fastened in the same manner as the original one. Its cubic capacity was increased, however, to accept a garcia bear cannister for our hikes in Griz country.
After using my external frame in 2004 while hiking through Glacier National Park, The Bob Marshal Wilderness and the ScapeGoat Wilderness I've become convinced of the beauty of this piece of gear.
We stripped the frame down to bare bones, while maintaining its superior hip belt and structure. The garcia bear cannister (with 7 days of food) inside did not cause undue strain. By doing so, rather than strapping it to the outside, a secure carrying system was implemented.
I enjoyed hiking through griz country using this system. How to pack a bear cannister with 7 days of food will be useful reading, and help with food planning.
When taking larger loads, like the Cheyenne teepee, and base camping, the external frame allows me to carry much heavier, bulkier loads than a ultralight silnylon pack would. Its versatility is amazing.
Video Demo : How to make your own packless system.
I used the new pack described above to make this video. I believe it will help in designing all types of backpacking gear as well.
Thanks for watching.